Wednesday, November 27, 2013

Simple Dessert - Apple Crisp

Thanksgiving is tomorrow.  For dessert, I am making a simple apple crisp.  It is yummy, seasonal, and requires few ingredients.

I used local apples my husband picked up from the Farmer's Market today.  He told the man at the apple stand that I was making apple crisp, and the man loaded Chris's bag with "the perfect apples".  I believe they are Cortland apples.  They are rather tart, but that is what you are looking for in an apple when you are making a dessert with them.

The first step is quite tedious.  Peel, core and cut up the apples.  Normally, I don't like the use of kitchen gadgets, but after spending over an hour coring, peeling and quartering apples for apple butter I made earlier in the year, I decided to give this peeler a shot.  After all, it is still relatively simple in it's design.

First, I clamped the peeler to the table and stuck the apple on the prongs.


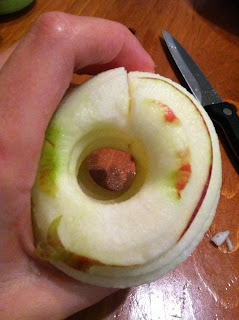
Then, I just turned the handle, and the apple was peeled and cored.


Now the apple is peeled and cored.  All I have to do is cut it up.


You can see the slices that it makes.  I still cut the apple up more before putting it in the pan.


Look, MA! No core!  I thought that was pretty neat.


As I go, I put all of the apples into my baking dish.  I don't grease the dish.  Remember, this is simple.  I then add a tablespoon or two of sugar.  Organic. 


Sprinkle some cinnamon over it.  If you really like cinnamon, use a lot.  It's really about what you like here.  Sprinkle some vanilla extract (please, I beg you, use the real stuff).  Not too much.  About a teaspoon.


Dot with butter.  I think I used about 2 tablespoons here.  I don't know why I did it.  I think because that is how my mom does it?


Now, we make the stuff that turns this from just baked apples to apple crisp.  The Crisp!!

I took about 6 Tablespoons of butter, 


Add some cinnamon, and about a half of a cup of all purpose flour.  (organic)


I add about that much salt.  (1/4 to 1/2 teaspoon)  It's really hard to mess this up.


Now add about 1/4 cup and 2 tablespoons of sugar.  The fun part is coming up!!


Get your hands in there an mash it up.  Get all the ingredients well combined with the flour.


It should look like this when it's done.


Sprinkle that on top of your apples and bake in a 350 degree oven for about 25 minutes or until it's nicely browned.


Take out of the oven and enjoy the yummy tastes in your mouth and smells in your house!


Monday, November 18, 2013

Intro to the Older Chickens

I have talked a lot about my baby chicks.  Mostly because they are so cute and they are growing up in my office, so I see them a lot.  I have been remiss not to mention my other laying ladies.  I have five girls who are over five months old.  From what I've read and a farmer I've talked to, they should be laying eggs for us right now.  Unfortunately, they did not talk to that farmer and did not read those things.  We have no eggs.  I will be sure to let you know when we do.

Let me introduce you to my older bunch.

They are enjoying the warmth of their coop.  When this picture was taken, it was quite cold outside.  You can see the roosts.  The black one on the left is Betty.  She is the sweetest and most bold.  The two brown ones in the middle and the one on the far right are Easter Eggers.  They should lay blue tinted eggs (when they start laying!).  The black and white girl is a silver laced Wyandotte.  We have named her Psycho for all of her antics while in the brooder.  She has calmed down quite a bit, but has not lost her name.

Tuesday, November 12, 2013

Chicken Coop

I have some older chickens that live outside right now.  My husband built their coop for them.


My husband, Chris, is a genius.  Most of our materials we got for free, and my husband was able to put it all together to make this rustic coop.  The siding is cedar which he found on Craigslist.  The 4x4 posts which provide the stability were from a fencing company.  When the company tears down an old fence, they just burn it.  We got to reuse it!! Yippee!

The framing is made out of old wooden squares that are used a local soda company.  Here is one of the rectangles:


Chris has oodles of them.  We have used them to raise some beds in the garden and we have cut them up and burned them in our wood stove.  


So those are the frame and the gate.  You can see the gate propped open by the 2x4 on the right side of the coop.  

Chris had to buy the roof and the hardware.  That was it!  Let's take a look on the inside.  The nesting boxes are made out of old shelves in the basement of our house.  Chris made the roof with a slope so that the chickens could not roost (and therefore poop) on top of them.  We also put old golf balls inside of the boxes so that the girls would have an idea where to lay.  I'm not sure if this works, as our girls haven't started laying yet.


One the right, you can see the roosts Chris installed.  This is just old dried out bamboo that we also got for free!!! Darn, we are doing good.  Thank goodness for my husband's handiness.  You can see below the roosts there is bunches of poop.  We do a deep bedding method.  So I simply put more fresh straw on it every few days.  Over the winter, the decomposition will heat the coop, and when it starts to get warmer we will clean out the coop and put the bedding in our gardens and around our trees.  


We bought the waterer and food dispenser, though.  We hung them from the ceiling so that there would be limited dirt and scratchings in the food and water. 


Overall, this entire project was Chris's baby and he did an excellent job.  He has a vision,  and skill and always amazes me.

Jaxson also gave the set-up an inspection and he approved.


Wednesday, November 6, 2013

Our Visitor and Baby Chicken update

We have had some cold nights over the past weeks.  We have also had some pretty warm days.  But this is the pattern the fringes of the season seem to go.

I found a visitor on our front door this morning:


What a gorgeous bug.  This guy is pretty hardcore, too.  It's like the Great White Shark of bugs.  

I also wanted to share the progress that my little girls are making.  They are still warm in my office, but now they are making a great mess.  There is dust everywhere.  As you can see in the picture below, we have added a fence around the wading pool.  They are small enough to fit through the fence, so this is rather ineffective at keeping them in.  


All of the girls got together to pose for the picture below.  From left to right, we have the Dominique, a Fayoumi, behind her is the White Sultan named Beatrice (I love the White Sultan's spike feather look).  In front of the White Sultan  is a Jersey Giant, who is kind of hiding the other Fayoumi, and lastly, we have another Jersey Giant.  I plan on naming the other Jersey Giants, as they are my favorites, but I have to wait to see more of their personalities.  These birds tend to name themselves.


You can see a really great picture of the Fayoumi below.  Fayoumi's are very tall and thin.  It is so exciting to watch them grow.  As you can see, we also added a roost for them to perch on.  The only one who is really enjoying the roost right now is the Dominique.  


They are all doing really well. In a few weeks, I plan to remove the heat lamp.  Once they get used to that, I will be moving them out to the garage to get used to the cold before their final move outside.  They should begin their lives outside by January.